
Acronis Backup - Scheduling backups
How to schedule backups via Acronis control panel
Acronis Backup provides a default backup schedule for each device associated with a Client account, nicknamed Entire Machine in the Cloud.
However, the user can create a customised backup schedule and set different parameters (frequency, type, etc.) according to the needs. Below are the steps to carry out a customised schedule procedure on workstations (the items may vary depending on the type of device and the operating system, see the backup plan overview for a complete indication):
- Log in to the control panel (https://cloud.acronis.com) and go to the Backup & Disaster Recovery section. For more details see our guide al Acronis Backup: how to log in to the control panel.
- Select a device from the Devices screen, the first one to be loaded automatically. Click on the Protect item on the right-hand side of the screen:
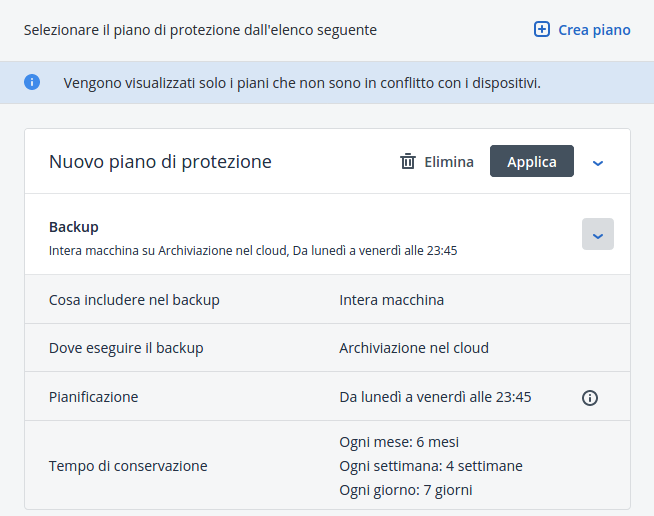
- A new window will appear in which the Entire Machine in the cloud plan mentioned previously will be visible. Clicking on the Apply button will decide to execute this plan on the selected device. To create a custom backup plan click on Create plan:
- After a few moments, the following screen will be shown:

Click on the pencil icon to rename the backup plan.
Click on the Edit entry next to Backup Options to edit all available options.
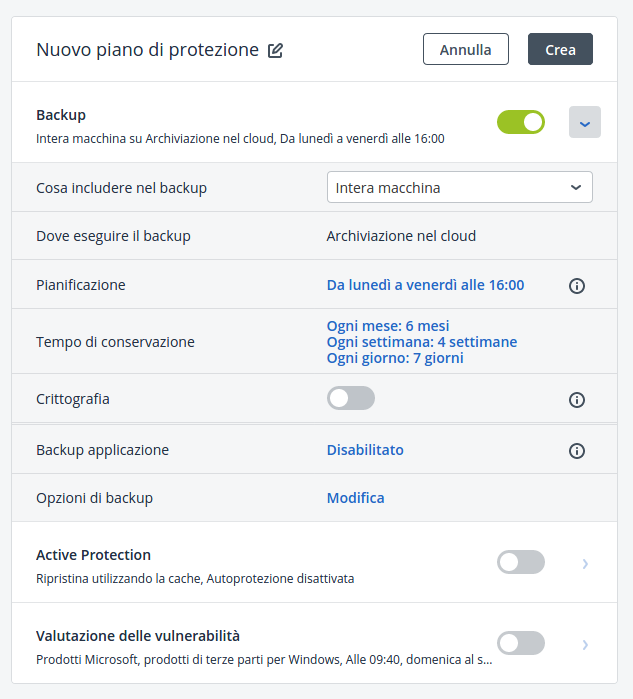
Overview of settings
Here is an overview of the available settings you can use to customise your backup.
Overview of basic settings
The basic settings on which you can act are as follows:
- What to include in the backup: Defines the items to include in the backup.
LPossible choices are: Entire Machine, Disks/Volumes, Files/Folcders, System State.
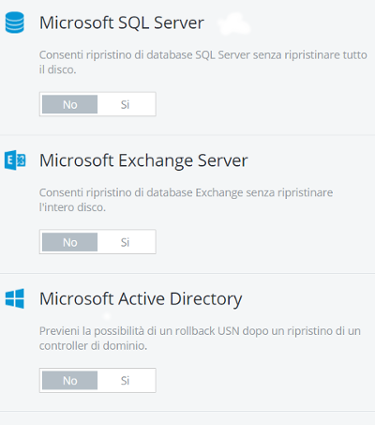
In particular:- If the Entire Machine is selected, the Application Backup option will also be available:
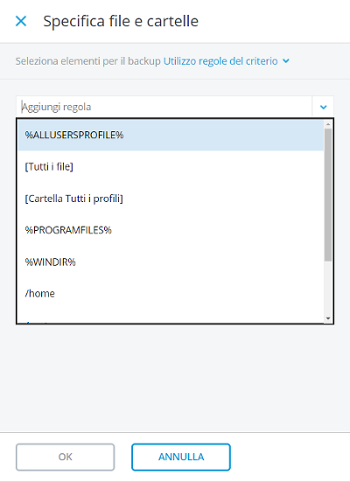
- When selecting Disks/Volumes or Files/Folders you will need to indicate the items to be included in the backup by clicking on Specify. Please refer to the official Acronis website to see the description of the rules for Disks/Volumes
and Files/Folder:
- When selecting System Status (only for machines with OS Windows Vista or higher) various items are backed up (VSS metadata store, MSSearch service, Windows management tools etc.), which can be found on the page Selecting System Status.
- If the Entire Machine is selected, the Application Backup option will also be available:
- Where to back up: destination where the backup created will be saved (and therefore be retrievable later by the user). Choose between Cloud storage, Local folders, Network folders. In addition, depending on your operating system and/or certain settings, you may have other options such asNFS Folder and Secure Zone.
- Scheduling: allows you to set the frequency of backups.
Choose between Every month, Every week, Every day, Every hour. According to the selected item, it is possible to define further parameters, as shown in the following screen (days of the week, time, date ranges):
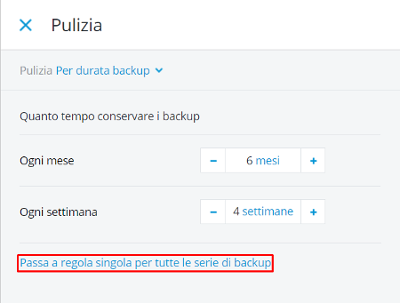
- Retention period: Defines how long backups will be retained; on expiry each backup will be deleted.
Choose from By backup duration, By number of backups, Keep backups for an unlimited period.- By selecting By backup duration you can define the duration for which backups will be retained (the items available vary according to the choices made in Scheduling). If you wish to apply a single rule to each type, click on Switch to single rule for all backup series and indicate the desired retention period.
- Selecting By number of backups will retain a number of backups equal to the value specified by the user.
- Selecting Keep backups for an unlimited period will not delete any backups. The number of backups that can be stored varies depending on the total storage space of the selected destination (Where to back up section).
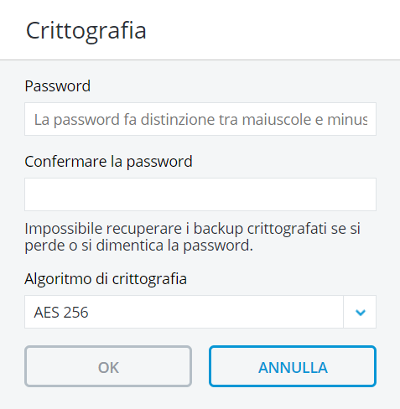
- Encryption: allows backups to be protected by encryption. The password and encryption algorithm (AES 128, AES 192, AES 256) can be defined. If the password is lost, the backups cannot be used.
- Once you have defined the preferred settings, click on the Create button and wait for the customised backup program to be saved.
Overview of advanced settings
- Alerts: enables notifications to be sent if full backups are not performed for a specific number of consecutive days. The item is shown immediately on opening the advanced settings.
- Fast incremental/differential backup: speeds up the process of analysing files to be included in a backup: to determine whether or not a file has been modified since the last backup available in the archive, the programme will rely on the time and date, without performing a longer element-by-element analysis. This setting is enabled by default.
- Weekly backup: Indicates the first day of the working week to perform correctly scheduled weekly backups.
- Sector-by-sector backu: if enabled, the programme will also include in the backup all sectors of the disc/volume that do not contain data, so the total backup size will be equal to the size of the selected disc/volume (e.g. a 150GB partition will produce a 150GB backup). To be used when backing up disks/volumes with unsupported file systems. This setting is not enabled by default.
- Changed block tracking (CBT): An option that speeds up the backup operations of virtual machines. This setting is enabled by default.
- Pre-Post Commands and Pre-Post Data Acquisition Commands: allows specific commands to be executed before/after a backup procedure is performed and before/after data acquisition. This setting is not enabled by default. See the pre/post Commands guide for more information.
- Backup validation: if enabled, performs a verification procedure of the data included in the backup just created. As this is a validation operation, it requires a certain amount of time. This setting is not enabled by default.
- File filters: allows you to manually define which files should be included in backups or not (based on their name, path or mask). It is also possible to exclude hidden files/folders and system files/folders.
- Error handling: if the copy of a particular item fails, the programme will try to include it again in the backup a number of times equal to the specified value (300 by default). The time interval (seconds, minutes, hours) between attempts can also be specified. If the ignore bad sectors option is enabled, no further attempts will be made and the programme will move on to the next items. This setting is not enabled by default.
- Activity failure management: if active, in the event of a failed scheduled activity, the programme will attempt to back up again a number of times equal to the indicated value. Also in this case it is possible to define the time interval between attempts. This setting is enabled by default.
- ompression level: higher compression levels increase the time required to create backups but at the same time decrease their total size - less space will be occupied in the destination archive. This level is set to Normal by default.
- Performance: allows you to define how much system resources and computational capacity to allocate to the backup process. You can also limit the Acronis agent output speed. More resources allocated to the backup process can speed up task execution but at the same time affect the overall system performance. Set to Low by default.
- Scheduling: enables initial data collection. The program will automatically start multiple backup operations within a user-defined time window (with respect to the original schedule). However, it is possible to perform operations at the scheduled times by selecting the Start all backups exactly as scheduled.
- Data collection: not enabled by default.
- Windows event log: Allows the following events to be entered in the Windows event log: all events, errors and warnings, errors only. This setting is not enabled by default.
- Volume Shadow Service (VSS): setting available only for Windows systems and relevant to the creation of snapshots. This setting enabled by default. For more information, see the Volume Shadow Service (VSS) guide.
- Multi-volume Snapshot: available for Windows systems only. Use this option to create a consistent backup of extensive data across multiple volumes, for example, for an Oracle database. This setting is enabled by default. See the Multi-Volume Snapshot guide for more information.