
GD2 Library for PHP
How to use the GD2 Graphics Library
It is possible to use the image management functions of the GD2 library on all hosting plans with PHP language support.
NOTE If scripts using this library save the new image in the space associated with the plan, make sure that the destination folder is configured with write permissions, which can be set from the control panel in the Gestione permessi cartelle e files (section (Windows plans), or directly with the chmod 777 command on the destination folder (Linux plans).
Page menu:
- Creating a new image
- Creating a function graph
- Creating a histogram
- Resizing an image
- Documentation on php.net
Creating a new image
<!DOCTYPE html PUBLIC "-//W3C//DTD XHTML 1.0 Transitional//EN" "http://www.w3.org/TR/xhtml1/DTD/xhtml1-transitional.dtd">
<HTML>
<?php
$font_size = 5;
$letter_width = imagefontwidth($font_size);
$letter_height = imagefontheight($font_size);
$messaggio = "Ciao!!!";
$larghezza = strlen($messaggio);
$larghezza_px = $letter_width * $larghezza;
$im = imagecreate($larghezza_px + 10 , $letter_height + 10);
$background = imagecolorallocate($im, 0xFF, 0xFF, 0x00);
$textcolor = imagecolorallocate($im, 0x33, 0x00, 0xCC);
imagestring($im, $font_size, 5, 5, $messaggio, $textcolor);
imagejpeg($im, "images/test1.jpg");
imagedestroy($im);
?>
<head>
<title> GD - Test 1 </title>
<meta name="Keywords" content="">
<meta name="Description" content="">
</head>
<body>
<img src="images/test1.jpg">
</body>
</html>
The script shows in a simple way how to create an image containing text. The script automatically calculates the pixel size of the text, so that an image of the right size, including a padding of 10 pixels, is created using theimagecreate function.
Once created, the image is saved in the folder, using the imagejpeg function, in the relative path "images/test1.jpg" (the images folder must have write permissions).
Once saved or streamed, the image must be removed from the server’s memory using the imagedestroy imagedestroy
Here is the result of the script:
imagestring is not the only function that allows you to write text in the image. A more powerful function, which allows you to choose the font, for example, is imagettftext.
Creating a function graph
<?php
$maxX = 400;
$maxY = 200;
$img = imagecreatetruecolor($maxX, $maxY);
$background = imagecolorallocate($img, 0x4D, 0x65, 0x73);
imagefill($img, 0, 0, $background);
$pencolor = imagecolorallocate($img, 0xFF, 0xFF, 0x00);
$ascissecolor = imagecolorallocate($img, 0xFF, 0xFF, 0xFF);
$xnumerico = 6.28;
$passo = $xnumerico / $maxX;
$mezzo = round($maxY/2);
$i = 0;
$x0 = 0;
$y0 = $mezzo;
imageline($img, $x0, $mezzo, $maxX, $mezzo, $ascissecolor);
while ($i<=$xnumerico) {
    $y = round($mezzo - sin($i)/$passo);
    $x =  round($i/$passo);
    imageline($img, $x0, $y0, $x, $y, $pencolor);
    $i += $passo;
    $x0 = $x;
    $y0 = $y;
}
$messaggio = "y = sin(x)";
$textcolor = imagecolorallocate($img, 0xFF, 0xFF, 0xFF);
imagestring($img, 3, 5, 5, $messaggio, $textcolor);
imagejpeg($img, "images/grafico.jpg");
imagedestroy($img);
?>
<!DOCTYPE html PUBLIC "-//W3C//DTD XHTML 1.0 Transitional//EN" "http://www.w3.org/TR/xhtml1/DTD/xhtml1-transitional.dtd">
<HTML>
<head>
<title> GD - sin(x) </title>
<meta name="Keywords" content="">
<meta name="Description" content="">
</head>
<body>
<img src="images/grafico.jpg" border=0 alt="sin(x)">
</body>
</html>
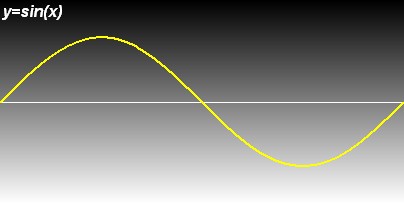
In the example, the imageline function is used to draw a line from position ($x0,$y0) to position ($x,$y). The colour of the brush is set by the imagecolorallocate function.
he pair (x=0,y=0) is the reference to the top left corner of the image. The script first draws the abscissa in the middle of the image, then calculates the ratio between the horizontal amplitude of the graph (in this case 2*PI_greco radians, so ~6.28, stored in the variable $xnumerico) and the amplitude in pixels of the image, which will be used to obtain the physical coordinates for drawing the line from the coordinates returned by the function x=sin(y). Ffor the ordinates, it is also necessary to take into account the offset round($maxY/2) and the fact that, unlike the Cartesian plane, the ordinate (y) for the representation of the image grows from top to bottom.
Once saved or streamed, the image must be removed from the server's memory using the imagedestroy function.
Here is the result of the script:
Creating a histogram
<?php
$valori = array(1,3,4,2,3,2,-1,10,-3,5);
$min = min($valori);
$max = max($valori);
$ampiezza = $max - $min;
$maxX = 400;
$maxY = 200;
$img = imagecreatetruecolor($maxX, $maxY);
$background = imagecolorallocate($img, 0x4B, 0x71, 0x8B);
imagefill($img, 0, 0, $background);
$pencolor = imagecolorallocate($img, 0xFF, 0xFF, 0x21);
$ascissecolor = imagecolorallocate($img, 0xFF, 0xFF, 0xFF);
$bordocolor = imagecolorallocate($img, 0x00, 0x00, 0x00);
$passoy = ($ampiezza / ($maxY - 80)) ;
$larghezzabarra = round(($maxX-10)/sizeof($valori));
$mezzo = round($maxY/2);
imageline($img, 0, $mezzo, $maxX, $mezzo, $ascissecolor);
for ($i = 0; $i < sizeof($valori); $i++) {
    $x1 = $i*$larghezzabarra+5;
    $y1 = round($mezzo - $valori[$i]/$passoy);
    $x2 = $i*$larghezzabarra + $larghezzabarra;
    $y2 = $mezzo;
    imagefilledrectangle($img, $x1, $y1, $x2, $y2, $pencolor);
    imagerectangle($img, $x1, $y1, $x2, $y2, $bordocolor);
}
$messaggio = "istogramma";
$textcolor = imagecolorallocate($img, 0xFF, 0xFF, 0xFF);
imagestring($img, 3, 5, 5, $messaggio, $textcolor);
imagejpeg($img, "images/istogramma.jpg");
imagedestroy($img);
?>
<!DOCTYPE html PUBLIC "-//W3C//DTD XHTML 1.0 Transitional//EN" "http://www.w3.org/TR/xhtml1/DTD/xhtml1-transitional.dtd">
<HTML>
<head>
<title> GD - istogramma </title>
<meta name="Keywords" content="">
<meta name="Description" content="">
</head>
<body>
<img src="images/istogramma.jpg" border=0 alt="istogramma">
</body>
</html>
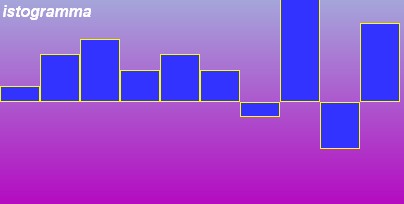
The script is similar to the previous one and is useful for drawing a vertical histogram from a vector of values.
The functions used here are imagerectangle which draws an empty rectangle (the edge of a rectangle) from the top left-hand corner (coordinates {x1,y1}) to the bottom right-hand corner (coordinates {x2,y2});imagefilledrectangle which draws a filled rectangle at the given coordinates.
Once saved or streamed, the image must be removed from the server's memory using the imagedestroy function.
Here is the result of the script:
Resizing an image
Script resize.php
<?php
$maxx = $_GET["maxx"];
$maxy = $_GET["maxy"];
$source_image_URL = $_GET["src"];
$source_image = imagecreatefromjpeg($source_image_URL);
list($width, $height) = getimagesize($source_image_URL);
$percent1 = $width / $maxx;
$percent2 = $height / $maxy;
$percent = max($percent1,$percent2);
$new_eight = round($height /$percent);
$new_width = round($width /$percent);
$dest_image = imagecreatetruecolor($new_width, $new_eight);
imagecopyresampled ($dest_image, $source_image, 0, 0, 0, 0,
 $new_width, $new_eight, $width, $height);
header("Content-type: image/jpeg");
imagejpeg($dest_image);
imagedestroy($dest_image);
imagedestroy($source_image);
?>
This example is probably the most interesting of those proposed by the guide. The script, called resize.php, resizes an image and streams the result to the browser instead of saving the image to disk - useful for creating thumbnails in real time without storing the files in storage space.
Resize.php expects the maximum horizontal and vertical dimensions of the final image and the URL of the source image, which can also be in the form https://www.nomedominio.it/immagine.jpg. The script then obtains the size of the source image using the getimagesizefunction and calculates the compression ratio, so as to maintain the proportions of the original. The new dimensions are then calculated and a new image is created using imagecreatetruecolor. Finally, using the imagecopyresampled function, the old image, which has been resampled and resized in this way, is copied onto the new image before being streamed to the browser.
Once saved or streamed, the image must be removed from the server's memory using the imagedestroy function
The script can be called up directly from the browser by entering the maxx and maxy values to be sent in GET, or in the src (source) attribute of an html tag, as shown below.
<!DOCTYPE html PUBLIC "-//W3C//DTD XHTML 1.0 Transitional//EN" "http://www.w3.org/TR/xhtml1/DTD/xhtml1-transitional.dtd">
<HTML>
<head>
<title> GD - Test di ridimensionamento </title>
<meta name="Keywords" content="">
<meta name="Description" content="">
</head>
<body>
<img src="resize.php?maxx=100&maxy=50&src=images/grafico.jpg" alt="resized">
</body>
</html>
Here is the result of the script, which resizes the image for the second example.
