
How to transfer a website with Migration Tool
How to transfer a static website with the Migration Tool, the online service provided by Hosting Solutions.
Migration Tool s the online tool designed to facilitate the migration of a websiteto the Hosting Solutions servers. Transferring a portal is a delicate and complex operation that involves several steps. Thanks to its intuitive interface, Migration Tool reduces the steps involved in moving a website to just a few clicks.
To access the Migration Tool for the migration of a website, you need to connect to the following URL:
https://wp.migrationtool.it/soloftp.php
Before starting the transfer, it is important to note that:
- The site folder on the source server deve essere ancora present at the time of the transfer;
- The site folder on the target server must already have been created at the time of the transfer.

In order to migrate the files of a website, it is first necessary to provide the tool with the main URL (home page address) of the site to be transferred, by entering it in the field URL site to be transferred; in addition, the following information, necessary for the FTP transfer from the old server, must be provided in the fields of the form FTP data Old service:
- Server: IP address or name of the source server ;
- User: User for FTP access on the source server;
- Password: Password for FTP access on the source server.
Before continuing, carry out the connection test by pressing the specific button. If successful,
a message such as successful connection to [IP address] with user [username@IP address].
will be displayed. If not, check the connection data to make sure it is correct.
If the connection to the database is successful, select the name of the folder on the old server,
containing the site files to be transferred from the Folder list.
If the data provided are correct, a new form will be displayed on the right-hand side entitled FTP Data New Service:
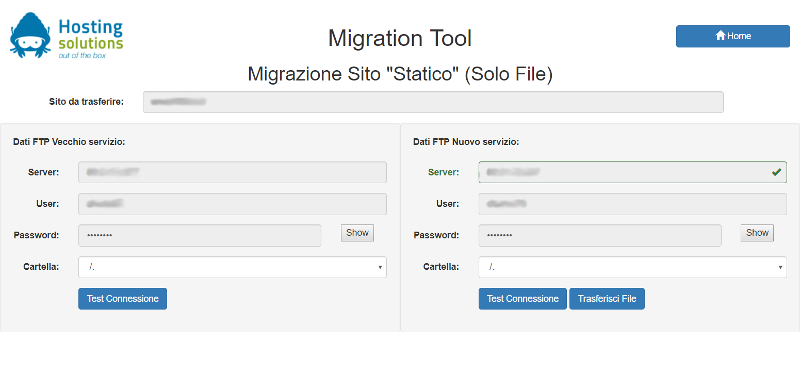
The following information required for FTP transfer to the new server must be entered in the new form:
- Server: IP address or name of the target server;
- User: User for FTP access on the target server;
- Password: Password for FTP access on the target server.
After testing the connection to the target server using the specific button, provide the transfer destination folder (previously created) by selecting it from the Folderlist, where the files of the site being migrated will be copied.
Then start the transfer by pressing the File Trasfer button.
If the migration is successful, a message will be displayed as in the following image:
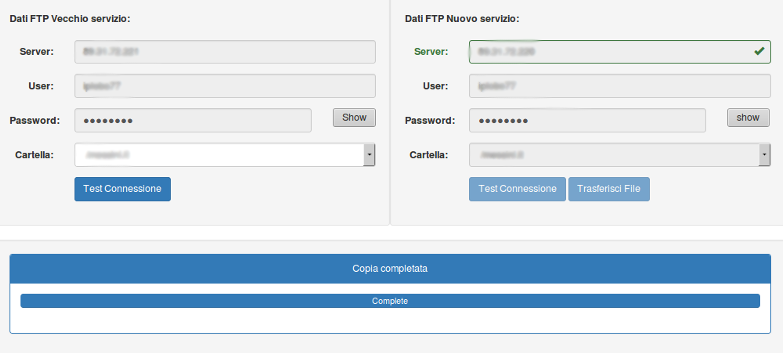
Once these operations have been carried out, the migration of the website files is complete.
Finally, to make the newly transferred site available on the Internet, it will be necessary to update the DNS servers with the IP address of the new server.