
phpList - Starter guide
Introduction
To start a messaging campaign with phpList you need to log in with administrator credentials and:
- have a mailing list (list of subscribers) to send the message to;
- have correctly defined the characteristics of the campaign and therefore of the message to be sent to the mailing list.
Create a mailing list
The mailing list is a list of email addresses (verified, that is, for which the recipient has given clear consent to receive email campaigns) to which the campaign message will be sent. This list is created by the administrator and is initially empty; it will then be populated (manually or by importing files) with a set of email addresses.

To add email addresses to a list you can follow two paths, which both lead to the IMPORTA EMAIL (IMPORT EMAIL) page.
- From the Pagina di Amministrazione (Administration page) tab Liste ed utenti (Lists and Users) button (Import Users)
- From the top menu: Utenti (Users) item Importa email (Import email).
There are several ways of adding addresses to the list:
- Copy and paste a list of emails
Click on this button to open the IMPORTA EMAIL SEMPLICE (IMPORT SIMPLE EMAIL) page, where you can directly write or paste a list of email addresses, one per line, into the box provided. In addition, you need to tell phpList whether this list of addresses will create a new list (the ‘Aggiungi Lista’ -Add List button) or whether it will be added to a previously created list (to do this, check the box for that list in the phpList at the top of the page). - Import by uploading a file with emails
Click on this button to open the IMPORTA EMAIL DA FILE (IMPORT EMAIL FROM FILE) page, where you can tell phpList which email address file to import into a new list (the ‘Aggiungi Lista’ -Add List button) or if it will be added to a previously created list (to do this, check the box for that list in the phpList at the top of the page).
The file that contains the email addresses to be imported must have a specific format:- It must be a text file (no binary, no word type)
- it must contain one line per address (and each line must present the email address first), plus any other information about the user of that email, which will be saved by the system.
- Import a csv file with emails and other data
Click on this button to open the IMPORTA EMAIL DA FILE CSV (IMPORT EMAIL FROM CSV FILE) page, where you can tell phpList which csv file (Comma-Separated Values: text file with field separator, default TAB) with the email addresses you wish to import into a new list (the ‘Aggiungi Lista’ -Add List button) or if you want to add them to a previously created list (to do this, check the box for that list in the phpList at the top of the page).
The csv file to be imported must have a specific format::
- it must be a text file;
- it must contain all the field names (attributes) in top row (first line) of the list;
- The field name for the column containing the email addresses must be email(no 'e-mail', no 'email address' or similar);
- the predefined field separator is the TAB character, but if the file contains another type of character as a separator (comma, semicolon, etc.), it is possible to specify it by inserting this character in the Separatore di campo (Field Separator) box on the page. If this field remains empty, the system expects to find the TAB character as field separator;
Once one of these three ways has been chosen, the administrator must complete the import process by clicking on the Importa (Import) o Importa email (Import email) button.
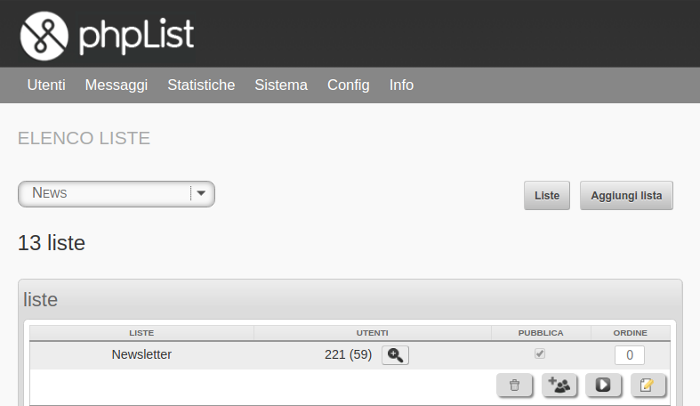
The administrator can then check that the addresses are in the list created by looking at the ELENCO LISTE (LISTS) page, found in the Utenti (Users) top menu.
Create a Campaign
Once you have added and populated the list of users, you can create the message that will then be sent to all the email addresses on the list.
To create a campaign, therefore, you can follow two paths, which both lead to the INVIA UN MESSAGGIO (SEND A MESSAGE) page:
- From the Pagina di Amministrazione (Administration page) Principale (Main) tab Modifica o aggiungi un messaggio (Edit or add a message) button
- From the top menu: Messaggi (Messages) menu item Invia un messaggio (Send a message).
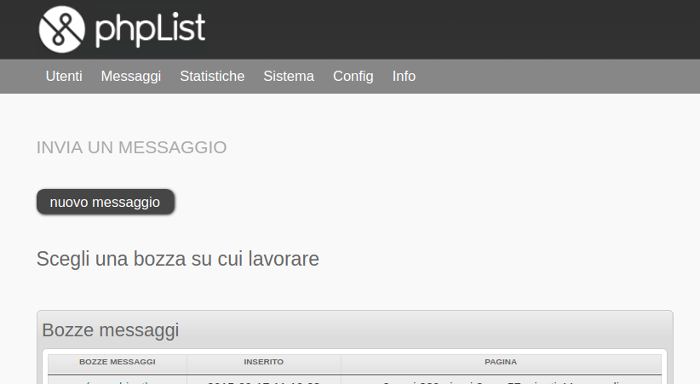
On the INVIA UN MESSAGGIO(SEND A MESSAGE) page, you can enter the message of the new campaign by clicking on the nuovo messaggio (new message) button: this click will display a set of tabs that will help the administrator to send the Campaign.

Below is a brief description of the most significant tabs.
The first tab displayed concerns the content of the message; it requires you to specify the following information:
- Subject: a title for the message to be sent which will then become the subject of the campaign sent to the list;
- From (address): the sender you want to appear in the email of the Campaign message;
- Content: this is the actual content of the message, which is generally in html format. It can be written using the editor provided on the page, which also includes a series of useful buttons for formatting the message (e.g. bold, justified alignment, insertion of images, etc.).
- Footer: this is the footer of the message and is in html format; phpList provides a default footer with the unsubscribe link (NOTE: this link is mandatory and it must be present in all messages). However, the content of the footer can be customised, except for the unsubscribe link.
In order to indicate to which list (or lists) of users the message should be sent, you need to open the Liste (Lists) tab: all the available lists will be displayed here and the administrator will choose the one (or lists) to send the message to.
NOTE Even if a subscriber is on more than one list at the same time, the message will only be sent once as, as a general rule, phpList only sends a message once per address.
To complete the Campaign, you need to get to the last tab Fine (End). If the previous steps have been correctly configured, the Invia messaggio (Send Message) button will appear, which will complete the operations by actually sending the messages (or queuing them, if required). If any information is missing or if there is any error in the campaign configuration, phpList will inform the administrator of the problem and will not allow the message to be sent.
The Invia messaggio (Send Message) button will only be displayed when phpList finds no problems with the procedure.